Project Aim.
The aim of this project is to create a 3D model of a castle we've designed based off concepts we've produced ourselves. The catch is to have the castle situation in a similar location/ way to the Norwich Castle, This means including the bridge crossing over to the castle (can be re-designed) and the raised mound the Castle is situated on. It is essential to have a lot of research into the castle design to give it a unified style/ theme and make the castle believable in whatever environment I've created it to be placed in. The final Aim is to have my castle textured, in a game engine and able to walk around it on appropriate terrain. The castle scene must also be in a choice of 3 times of day: Sunrise, Sunset and noon. However the weather is completely my choice, this allows me to create varieties on the 3 light settings. Weather effects and seasons is something I will most definitely want to include into my designs, If I could create snowfall, rainfall or flowing water that would be a really good achievement and create that extra piece of immersion for my castle environment.
Castle Research.
I collected a tonne of various looking castles from all over the world as I wanted to explore them all before I settled on my final theme. I wanted to include all variations, from Gothic to Persian. I also looked at a few games that included castles with a varied theme. The games I looked at where: Zelda (Hyrule Castle), Castlevania (Various), Dark Souls (Anor Londo), Assassins Creed (Various), Elder scrolls Skyrim (Windhelm) Prince of Persia (Various), Dynasty Warriors (Various), Uncharted 3 (Deseret Village), Age of Wulin (Various) and I also looked at Final Fantasy 12 (Rabanastre) and Accordo Castle from the trailer of Final Fantasy 15.
Mood Boards.


These 6 Mood Boards show the main 6 themes I want to explore, from the outcomes I'll then pick my favourite pieces to produce a final unified castle. I know I want to go for super realistic with this project, coming from a cartoony vector-based background I'm really interested in improving my realism skills and creating a truly immersive scene. As well as these main themes I also collected some research into some other themes, the 6 chosen are the most different and my favourite from the whole lot, below are the other mood boards studying some different types of castles and games art.


Modularized Mesh research.
Before I start to model my Castle I thought it best to research into techniques used to create simple environments and playable levels. I watched a Lynda tutorial on youtube on Modularized geometry. Basically Modularized Mesh is creating a bunch of created 3D elements which you use to stick together, like lego, to produce a finished building/scene. On castles this technique would be very useful as archways, pillars and pointed rooftops are all elements I can duplicate once created, just re-size to suite my needs.

Here is a print screen I took from the video showing the elements created. there's been a few variations of walls created, 2 door variations and a few archway variations. There's also a couple of columns which would be placed at random to break up the repeated look. I took the elements shown in this video and did my own interpretation designed to make a modular village instead of the 'Vaults' being created in this video. I created a variety of elements which will hopefully make the finished village not look too repeated.

I took the pieces and created a very basic village consisting of just 3 buildings, but all very different. I tried using the wall sections to create a tower, combining the small roof pieces into a plus symbol made for a, simple but, effective tower roof too. I'm very happy with the result considering how little time was put into creating the elements and the final buildings. Doing this method for myself has really shown just how much a useful modelling technique it is first-hand.

Textures.
After doing a few models I've realised how important textures are for your final outcomes. For this project I would like some very nice textures and to have a large input on the creation of the textures rather than just google-ing it and grabbing an image from the internet. This spurred me to collect textures first-hand by taking pictures of any interesting and appropriate textures I see for buildings or just anything that may prove useful later down the university pipeline. For now I've collected just a few images of walls and building resources; later I shall take some more, as and when I see textures I like, and also take some photos of more environmental pieces such as grass and ground textures or even leaves to create ivy and general natural overgrowth. I shall manipulate these textures to make them more easily tileable.
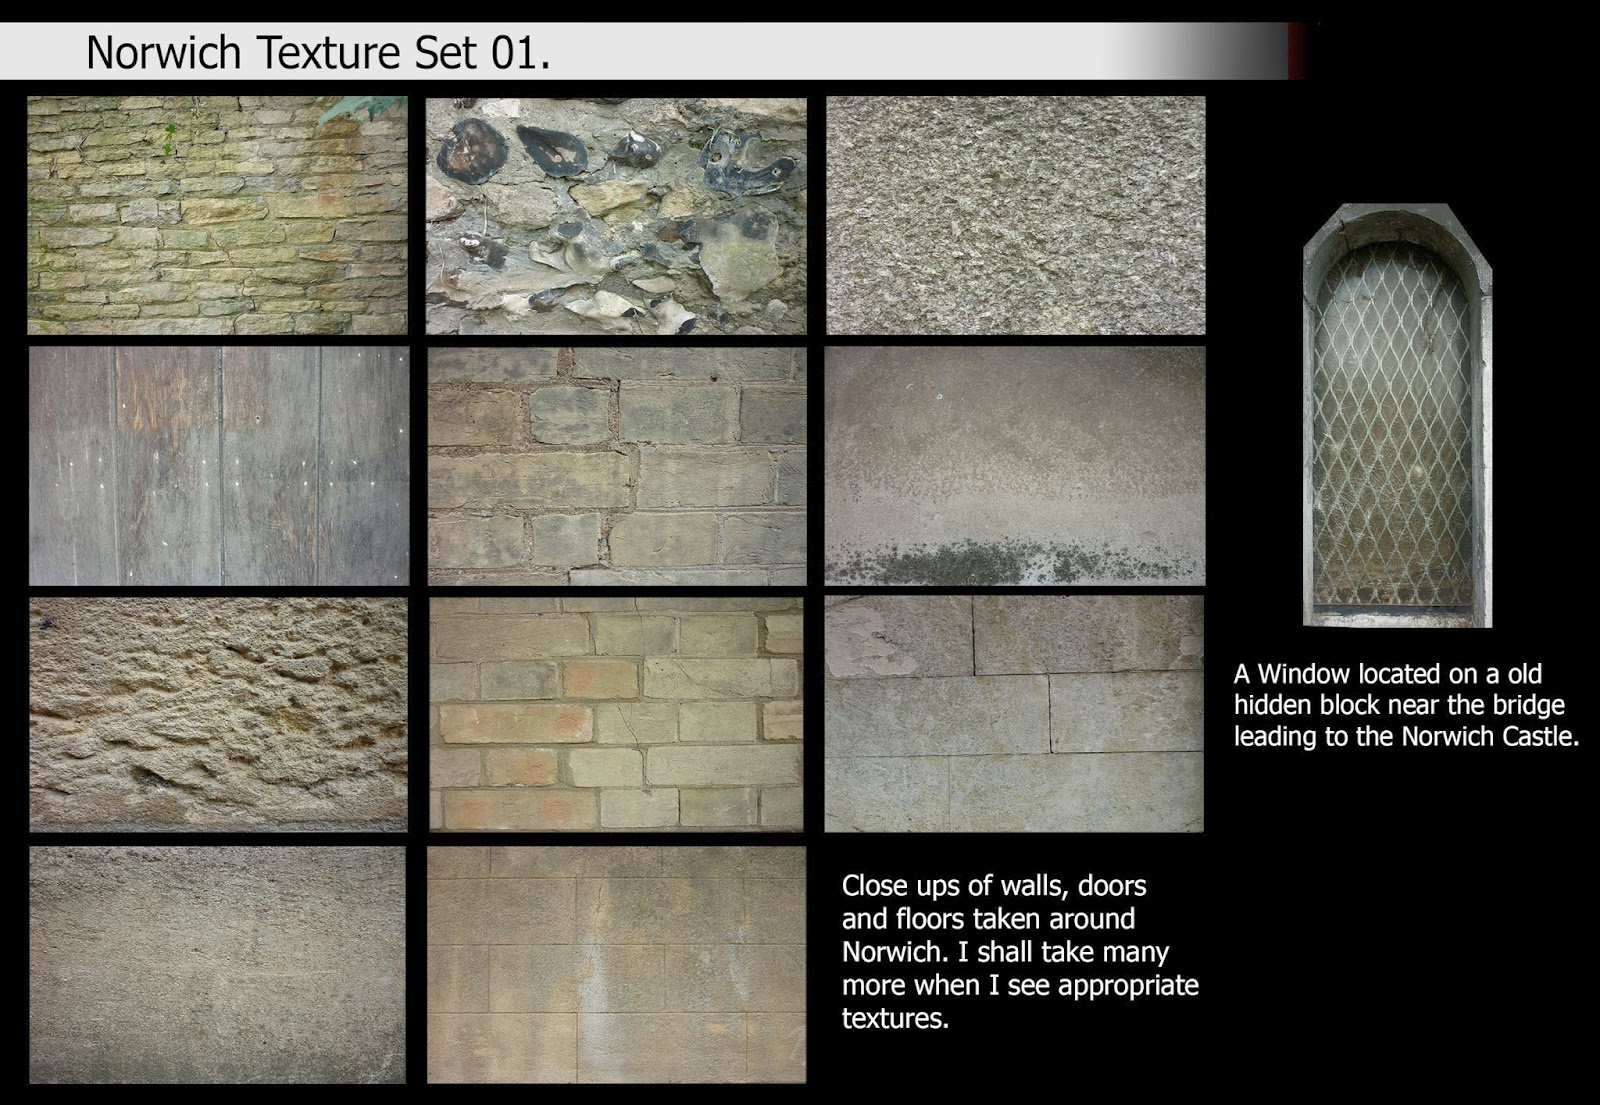
Being to Cambridge a few times I knew there was a large amount of buildings I could use there for appropriate textures and I didn't want to miss out on this opportunity. I went down to Cambridge with my camera and took a few pictures, After getting a few wall textures from Norwich I decided I needed more windows, doors and general images to use for details within my buildings. Cambridge had a fair bit to offer however the angles where very awkward to get most of the images, I had to manipulate almost all of them to get them at a flat perspective. I would like to collect more Textures from around Cambridge and maybe even look at Ely cathedral for primary references.


Tileable Textures Research.
Now I have a few Images I can use for textures I done some research into how to easily and effectively create Tileable Textures. I watched a video tutorial on YouTube which I took a print screen of and is posted below. A Tileable Texture is basically a image say of some pebbles which has been manipulated in photoshop so you an repeat that image on any side of the original image and they will connect up to create a larger image, the trick is to make the repeat too noticeable but most importantly to not have any noticeable seems where these images connect.

After watching the video tutorial I thought I would try this technique out myself on one of my more difficult, pebble like textures. I chose a cobbled wall I took a photo of and used the Photoshop filter offset technique shown in the video I watched to produce a tileable cobbled texture. Below you will see some pictures of my original Image, the image after it being offset and then the final, seem hidden, Tileable Texture. The whole process was reasonably quick and simple and is something I shall be doing with a majority of my building material images.

I then done a Test Image to see if the Images line up. The images didn't quite line up properly on the bottom/top of the Image so I shall have to put a bit more time and care into making it work seamlessly. This is something I will do more professionally with my future Textures but for just a first-time test I can really see how effective a good tileable texture is and just how much easier it is to make nice looking walls and buildings using this method. Creating Tileable brickwork and less stone-filled Textures should be a far easier task to produce a almost perfect texture.

Applying Tileable Textures To A Model.
I wanted to apply some tileable textures to a piece of geometry, for this I decided to just use the double wall section created in my Modular Mesh test. First I had to get another Texture to be tileable to apply to the archways on the wall, for this I chose a picture of some broken bricks as I thought it would compliment the cobbled back wall well.

Again I done a test image in Photoshop to see if the image was tileable and there weren't any obvious seems or incorrect alignments. Everything seemed okay.

I then Unwrapped my wall piece and started applying Textures to the UVs. I also created a bump map to make the bricks and cobbles have a more believable depth.

Once I'd done all this and applied the Texture to my object I then rendered it out using what I'd learnt about rendering and this is my final outcome.

Norwich Castle, Location Research.
This project is a very free project, we can create whatever we wish in whatever style we wish but the one thing that's been clearly set that needs to be in our design is the Norwich Castle surroundings, primarily the Moat it sits on and the bridge leading to it (Can design bridge and Moat however you want). Because of this I went and took a couple of photos of the castle from some different, distant angles to try to get as much of the castle and bridge in as I could.

From the photos I produced a very basic Maya scene to act as a kind of loose template for my castle model, It also helps me with scale as the template is all scaled appropriately to a little man imported from Mud box.

Narrowing Down The Options.
Out of my six favourite themes I looked at their styles and decided the kind of castle design I wanted for my final. This narrowed down my selection to 3, these where: Winter theme, Water theme and the Gothic/Bright theme. Now I have 3 favourite castles with a similar castle architecture, I shall start producing some concepts of these castle themes taking into consideration the layout of my Castle template previous. Once I have produced these concepts I shall settle on a favourite style of each elements (e.g: roofs, crenelations, archways, bridges etc..) from each theme, taking care that the elements all match and stick to a underlying theme to produce my final design. I'm getting very eager to start modelling now so shall try to get this stage done as efficiently as possible, also massive detail isn't needed in my concepts as that will come in the Textures and Normal Maps.

The main features I like from the winter theme are the extra piece which protrudes the end wall with the little windows all in it and also the small pointed roof pieces which follow the roof edge. These elements are things I will most definitely take into account when creating my final design. I also really like the snow as it's a way to add something a little different onto my design and help break up any repetition in textures and Modular Elements. From this I started designing my final, I knew that my most favourite theme was the 'Gothic Bright theme' but that I wanted to include elements from the 'Winter theme' and maybe slight influence of archways from the 'Water Theme.' But I don't want to mash too many things together that it becomes too un-believable or strays too far from a specific theme. My final design concept is very basic but leaves me with enough information to start on the modelling.

As I said it is very basic but it allows me to map out the layout of my castle in Maya using primitives as time is ticking and I'm very eager to start my model knowing the texturing process will be a lengthy one. From this I produced a kind of model sheet to base my final design on, I placed these primitives together and placed the combination on my Norwich castle layout piece to roughly show how it would work with the surroundings, particularly the bridge.

I'm reasonably happy with the layout and can really see my design within these shapes. Next I went onto the main modelling process and started making all the modular pieces that would be needed in my design to produce a finished castle. I started by writing a rough list of main elements I knew I'd need. (excuse the hand-writing.)

There was a few things I thought of as I went which I made but didn't make the list. But before I could model all the pieces I wanted to make sure I was doing some elements correctly and to a decent standard so I done a few tests of assets I'd need to create. Knowing I wanted my castle to be a cold environment with ice and snow, and maybe a frozen lake I started studying making Ice in Maya.

I then went on to studying trees knowing that was an asset I wanted to include to create a more realistic environment with slight organic elements. The test was slightly successful however their is noticeable gaps in the branches and it looks almost too spiky, I shall try this again after watching some more tutorials and find a way to have the branches in more different and more organic directions.

Next I went onto looking at icicles as I wanted any overhanging parts of the castle to have them dangling down. I knew they'd be a very small and barely noticeable part but that would make a difference to the over-all feel. Taking this into account I couldn't have them high poly and certainly not 3D, I looked into using a similar method to the tree branches to make easily repeatable icicle sprites I could scatter around my castle.

The outcome wasn't quite as successful as I had hoped but I have learnt and should, hopefully, produce something better for use on my final castle.


The way the snow falls came out exactly how I wanted it too. With a darker sky (light grey snow clouds) The snow will be more noticeable and hopefully produce a better effect. Working together with the snow settled on my castles roof I'm hoping will create a believable environment.


I thought I'd show the UV sheets of the textures to show how the textured elements work in a 2D plain and to show how I pieced the images together. This was my first proper time texturing something, particularly something that involved more than just one image of brickwork etc..And I'm very happy with how the UV sheets look, even if it is only very basic and has not a lot of information within the UVs. All the sheets had a semi-translucent overlay of a frost image to give the building a colder feel. I had a total of 8 UV sheets at 1024 resolution.


I thought It'd be interesting to take some print screens of my model with the textures off and wire frame on so you can see the polygons that make up my castle. I tried to keep it all fairly low poly and as neat as possible, I also tried to make everything out of Quads so would be easier to convert into a high poly sculpt if I so wished. Just trying to get into a good way of modelling which would work in the games industry on as many levels as possible.


Uvs Unwrapped and ready to be textured. I learnt from my mistakes unwrapping the rest f my castle and done it from planar mapping across the faces on each axis, this was a far more efficient and less distorted way of generating UVs for building objects than the automatic unwrap I had used primarily before. I also made sure not to make the pieces to small within the UV sheet so I avoided the low resolution problems of before.

I used a variety of techniques to produce the textures for my bridge and decided to make the snow as part of the texture rather than as extra, unnecessary geometry. I also settled on this idea, not only because I wanted to try it, but also because I wanted the walkway to have a coating of snow riddled with footprints to produce a realistic looking, regularly walked on surface. I'm very happy with the way the bridge came out and learnt how to produce far better textures during this bridge design process. The way I designed the bridge was a far more professional and efficient process and I will definitely be taking away a fair bit of knowledge to improve my future Maya elements.

With the bridge in place all textured it was time to think about putting my castle and terrain into a game editor.
Now my castle was all finished it was time to put it into UDK (Unreal Design Kit) and piece it together with my snow particle effects and also set up lighting and collisions so I could not simply walk through my castle. It took me a little while to get my head around how UDK worked but the whole process was relatively simple and I found UDK to be a nice game engine to produce simple walk around videos of my work. I imported my torches from maya without the flames as I found a very good torch flame particle effect I could use in UDK and also added a water material found in the directory so my water could be animated. This I adjusted so it suited the way I wanted it to look. I also set up some lighting for the torches as well as adjusting the over-all night lighting to a less glowing and less harsh light, I also gave it a slightly blue hue to the shadows and highlights. Here's a video of me walking around my castle complete with everything using the UDK team death match game mode as way to show how it would be implemented into a real game. I quickly edited this video adding some music I thought enhanced the feel of my level.
The main features I like from the winter theme are the extra piece which protrudes the end wall with the little windows all in it and also the small pointed roof pieces which follow the roof edge. These elements are things I will most definitely take into account when creating my final design. I also really like the snow as it's a way to add something a little different onto my design and help break up any repetition in textures and Modular Elements. From this I started designing my final, I knew that my most favourite theme was the 'Gothic Bright theme' but that I wanted to include elements from the 'Winter theme' and maybe slight influence of archways from the 'Water Theme.' But I don't want to mash too many things together that it becomes too un-believable or strays too far from a specific theme. My final design concept is very basic but leaves me with enough information to start on the modelling.
As I said it is very basic but it allows me to map out the layout of my castle in Maya using primitives as time is ticking and I'm very eager to start my model knowing the texturing process will be a lengthy one. From this I produced a kind of model sheet to base my final design on, I placed these primitives together and placed the combination on my Norwich castle layout piece to roughly show how it would work with the surroundings, particularly the bridge.
Final Idea Development.
I'm reasonably happy with the layout and can really see my design within these shapes. Next I went onto the main modelling process and started making all the modular pieces that would be needed in my design to produce a finished castle. I started by writing a rough list of main elements I knew I'd need. (excuse the hand-writing.)
There was a few things I thought of as I went which I made but didn't make the list. But before I could model all the pieces I wanted to make sure I was doing some elements correctly and to a decent standard so I done a few tests of assets I'd need to create. Knowing I wanted my castle to be a cold environment with ice and snow, and maybe a frozen lake I started studying making Ice in Maya.
More Tests And Studies.
I then went on to studying trees knowing that was an asset I wanted to include to create a more realistic environment with slight organic elements. The test was slightly successful however their is noticeable gaps in the branches and it looks almost too spiky, I shall try this again after watching some more tutorials and find a way to have the branches in more different and more organic directions.
Next I went onto looking at icicles as I wanted any overhanging parts of the castle to have them dangling down. I knew they'd be a very small and barely noticeable part but that would make a difference to the over-all feel. Taking this into account I couldn't have them high poly and certainly not 3D, I looked into using a similar method to the tree branches to make easily repeatable icicle sprites I could scatter around my castle.
The outcome wasn't quite as successful as I had hoped but I have learnt and should, hopefully, produce something better for use on my final castle.
Modular Elements.
Now I'd done all my tests and research I started to create all the elements I would need to produce my castle. I made these all taking what I'd learnt from my Modularized Mesh Study and trying to produce elements that would all fit together correctly.
I'm really happy with the outcome and hope this method makes the modelling and texturing process a far easier one. Again I used the Imported Mudbox man for scale. Now I have all my pieces I thought I should test if they actually fit together correctly. Thankfully they did all fit together very well; I only had to go back and adjust a few elements ever so slightly before I was satisfied with a seamless, minimal clipping modular building.
Unwrapping The UVs.
I started to create and adjust all my UVs in the UV editor. It was quite a lengthy process, particularly getting them a similar scale and no distortion. I tried to make any seams be in places no-one would really notice or in parts that a seam or slight distortion didn't effect the texture in any negative way. But finally I done it and ended up with a nice even checker across my modular elements.Even More Tests and Studies.
Whilst I'm texturing my objects I thought I should explore some more possibilities on the side to do with further details and the game engine. I started looking at the nParticle system in Maya as a way to easily produce believable snow lay on my castle. This should help break up the textures a bit and hopefully produce a nice outcome when put into the game engine. The struggle was making snow but keeping it a low poly, this was why I decided modelling the snow myself would be a long and poor idea. It took me longer then expected to get my head around how the nParticle feature worked and I made a few foolish mistakes but I got there in the end and can now utilize this asset within future projects. (the particles aren't so easy to see on my screenshots).
Now that I had a rough snow blanket to use I took it back to my modular elements test and laid it over the top of my castle test. The result isn't perfect but it is a starting point and with a few adjustments to the thickness and patchiness I should be able to make a very believable snow, especially with the addition of material attributes.
Weather Effects: Snow.
Now I'd gotten a nice way of laying snow upon my castle I wanted to create a weather effect in UDK to make it snow as you walked around. I followed a video tutorial on youtube (below) but made some adjustments to the fall rate and size/ radius as the environment my castle is in is a rather large one.
Taking the weather effect I created I jumped into my map and took a video of me walking around to show the effects.
The way the snow falls came out exactly how I wanted it too. With a darker sky (light grey snow clouds) The snow will be more noticeable and hopefully produce a better effect. Working together with the snow settled on my castles roof I'm hoping will create a believable environment.
Adjustments and General Snow Additions.
After adding snow to my castle I realised I had quite a thick lay which didn't work with the current trees I had. I decided I needed to use a similar technique on my trees. I used the same nParticle system just with a few adjustments to size of them and bumpiness and I also made it a much lower Poly as the trees are only small assets that will be repeated a few times. I'm pretty happy with the outcome and think it works far better with the castle look and the snowy environment I shall be creating. I feel the castle is starting to look very Disney 'Frozen'- like in the thick and clean lay of the snow.
Sketchbook Work.
Every now and then it's good to get out. Especially when working on Maya. During this project I had a few days of drawing tasks in a sketch book (consider them uni-day release trips). These trips where designed to keep our drawing skills up to date as game artists we need to be able to take things from real life and study/ draw these things in a believable way. First we went to the Norwich castle museum and where shown about 'focal point' work. this work involved us not getting bogged down by the 'detail monster' and putting in details where you want the viewers eye to be drawn to and slowly fading it out. This creates a area which pops out at the viewer and is a trick done with shading and line work. I sketched a medallion within the castle keep.
Later we where taken to the Norwich castle again, after looking at the gallery and a brief discussion of lighting and composition we moved on to our main task which was to draw some animals from the taxidermy. The idea was to get some sort of order of working in our sketch books. For this we had to do direct studies of animals considering their proportions, lighting and textures then the aim was to combine these animals but in a way that was realistic and could live, move and function perfectly fine. It was to be 'anatomically correct'. Unfortunately I never ended up with a finished sketch of the combinations as the spine was all deformed and I never got around to fixing it up. But alas, here is the animal studies all the same.
Finally we where taken around the Norwich cathedral grounds. This was a opportunity to do some studies of architecture and environmental surroundings which would help feed into our castle models. Not only this but it would aid us with environmental pieces from now on (which is something I really needed help with). We had 2 sessions each week. The first was focusing on perspective and they where looking for realistic angles and line work but also nice light capture and generally a good looking image, For mine I tried to include the focal point idea I'd learnt previously so loosened and lightened up my line work as got further away from what I wanted to be the main focus. The next week was composition week. This meant that what they where after was a nice environment sketch which focused on presenting a view which pleased the viewers eyes and lead them around the picture to a main point of interest you define. This was mainly based around thinking in primitives, so everything was made out of square, circular and triangular shapes and little to no details was added to the scenes. It was, after all, just about creating a nice environment layout which had good, realistic flow.
Textures.
Finally added all the textures to my castle. All My UV maps have been done, just need to piece together the castle and then make normal and specular maps to give the illusion of depth and material properties. I've rendered out the modular pieces with the flat textures all on for you to see. I'm reasonably happy with the outcome and although the textures look quite simple when pieced together and the snow is added it should produce a realistic castle. I didn't want to get bogged down with details so the whole thing is made from pictures, both from CG textures and taken myself from Norwich and Cambridge. I re-coloured and manipulated many pictures and here's my outcome.
I thought I'd show the UV sheets of the textures to show how the textured elements work in a 2D plain and to show how I pieced the images together. This was my first proper time texturing something, particularly something that involved more than just one image of brickwork etc..And I'm very happy with how the UV sheets look, even if it is only very basic and has not a lot of information within the UVs. All the sheets had a semi-translucent overlay of a frost image to give the building a colder feel. I had a total of 8 UV sheets at 1024 resolution.
Finished Materials (Castle Preview).
I used crazy bump to create normal maps based off height maps created in Photoshop using the high pass filter on a grey-scale versions of my UV sheets. I then used those created normal maps to create specular maps so the light would re-act to my fake geometry correctly. Once I'd done this I then pieced all my modular elements complete with their materials together to produce my final castle. I rendered the castle roughly just using the default sun and sky lighting in mental ray so I could see how the castle looked when rendered. I shall create my own lighting set-ups later once I have my completed terrain and any extra pieces of natural geometry I want to surround my castle. I'm going to create a new snow lay to go onto this castle as the old one didn't work so well or fit very well any more as I made a few slight adjustments to positioning of elements and it has many extra pieces.
I thought It'd be interesting to take some print screens of my model with the textures off and wire frame on so you can see the polygons that make up my castle. I tried to keep it all fairly low poly and as neat as possible, I also tried to make everything out of Quads so would be easier to convert into a high poly sculpt if I so wished. Just trying to get into a good way of modelling which would work in the games industry on as many levels as possible.
Disaster!
Taking closer looks at my castle I could see that all the larger elements in my castle (such as the large towers and walls) all looked very blurred and generally rubbish, the problem was you didn't even have to be that close to the model before you noticed this really low-res brickwork. I looked into it and realised I simply made myself too few UV sheets for the size of my castle, particularly where I'd combined larger elements and shrunk the UVs down to fit in the UV editor. I found all my towers and the large buildings where all very blurry in comparison to the smaller items such as the little turrets situated all over my castle. This is something I really wanted to fix, however whether or not I can fix them all so late in the project I do not know. This may be something I have to learn from for my next maya projects and settle with the textures on my object so far. But regardless I started trying to fix the main problem areas.
Above is a comparison of the original UV sheet for the main tower of my castle compared to what I ended up creating to increase the resolution of my castle (also noticed I missed texturing a face on the original UV so textured it with the wood as it should be). I ended up having to split my main tower up from one into three UV sheets before I noticed any significant difference. Below you can see the comparison between my main tower model before and after when looking at it fairly closely.
As you can see I made normal maps and specular maps again for the new UVs of the main tower and I can see a noticeable difference in quality. I have replaced the main tower of my castle with the newer version and it fits much better. The Textures still aren't 100% neat or still quite at the same quality level as the turrets, I think this is due to the textures on the new UVs being simple re-sizes of the old textures. If I where to build the texture again using the source images I think the images would have retained their resolution far better. I shall try to carry on this fixing of textures throughout my model however I still have my terrain to finish amongst many other things.
Back To Snow Stuff.
Now the main materials have all been created I thought I should go back to all the snow based things I'd previously tested out. Using the nParticle system I made a new lay of snow upon my castle, which I then textured and created bump and specular maps for (very quickly). I'm not 100% sure If I'm so keen on the thick lay of snow any more, however I think that's only because the surroundings don't suit it right now, It also worries me about how much it's bumped up my poly-count and I feel it's almost unnecessary all this extra geometry. however In a snowy terrain with the snowfall particle effect I previously created it should look far more like the castle should be covered in snow, the trees should also help carry this theme and I should be far happier with the idea. Again this was only a quick render using default sky and sun lighting so it's a bit bright and shiny.
Terrain.
After researching into snow lay and snow fall during the texturing process of my model I thought I should start thinking about terrain too. I'd heard about world machine and decided I wanted to give that a try as a new piece of software to learn, I'd also seen a few videos which had created environments at a very similar standard to how I wanted mine to look. As well as all this I'd seen the programme had some really simple ways to make great looking water and it was a programme designed to be compatible with UDK which I was going to use for my walk-around. As a starting point I printed off the render of my white box castle to easily draw terrain around it and then I got the idea of how I wanted my terrain to look down roughly on a train ride home.
To the right of the image you can see some of my scrawling of ideas that I wanted to include into my terrain and final game scene. I also started to think about lighting and time of day. In the top left you can see I sketched a 3D arrow to show the direction of light I was thinking of having for this scene. This gives me a solid, simple starting point to create my terrain and final game engine environment from. Using this Image as reference I opened up world machine and started playing around to try to get my head around it all. The programme is really quite simple to use considering how good the outcomes look you can produce. I'm really happy with my outcome.

The Terrain I ended up with was very high poly so I exported pieces separately so I could have a low poly model and bake the high poly version onto it in Maya using Normal maps. I also created Specular maps based off the normals I exported and exported the Texture maps used to colour the snow and mountains in world machine so I could use them in Maya.

After adjusting the material attributes of the low poly terrain to have the normal maps, specular maps and images on I then smoothed the normals of the low poly terrain so the bake laid smoothly over my low poly model.


The Terrain I ended up with was very high poly so I exported pieces separately so I could have a low poly model and bake the high poly version onto it in Maya using Normal maps. I also created Specular maps based off the normals I exported and exported the Texture maps used to colour the snow and mountains in world machine so I could use them in Maya.
After adjusting the material attributes of the low poly terrain to have the normal maps, specular maps and images on I then smoothed the normals of the low poly terrain so the bake laid smoothly over my low poly model.
More Tests! (yes, more)
After creating my terrain in world machine and making it work on a low poly model in Maya I decided to piece together the castle, the snow, the terrain and the snow covered tree test to create an environment similar to my sketch. For this one I decided not to use the default sun and sky lighting and create my own similar to how I'll want my final castle to be lit. I created a very feint directional light with a blue glow to simulate a bright moon glow in the night.
The lighting looks far better then the old renders and the pieces worked together better then I had planned. I think I may have to reduce the specular maps still as the light is being reflected too much in my terrain and brickwork. All I have left to do now is create the bridge to traverse the river gorge and set up my final lit render. Once I have all my pieces I shall also import them into UDK so I can run around the environment with the snow fall particle effect I created earlier.
New Textures.
After that 'disaster!' of having most of my castle being very low resolution I went back to the UVs and split them apart a bit so I could have larger Images within them. As I was already re-doing a majority of my textures I took this opportunity to add in extra features I wanted on my castle. This included: snow in-between brickworks and roof tiles and supporting bricks for edges of castles. I also adjusted most of the snow laying on the roof to make it less blobby and resolve any clipping issues. As well as all this I re-done most of my normal maps to make them a better standard and the bigger change I felt I needed to do was to the specular maps as my castle was too shiny and reflective so I also took the time to re-do those until I was happy with the outcome. Once I'd done all this I then added a background to my scene and set up some slightly better lighting then took some up close renders so you could see the improvement to my, previously very blurred and shiny, textures.
Torches!?!??
After rendering out the castle I realised it looked very uninhibited. Although I'm very happy with the outcome and the design is s'posed to be dark and enchanting I thought maybe some torches would like nice placed around the castle on pillars. I thought the warm fire light would compliment the cold colours of my castle so I gave it a go. Before I started anything I did a quick mood board on some torch designs I liked the look of.
Taking what I'd learnt from the research and my favourite torch design I created my own in Maya. I added textures and maps and created fire using interlocking planes with alpha channels.
I made the torch very simple and very low poly as it's such a small detail within my overall design and I don't want it to take anything away from my main features. I'll brighten up the fire a bit before my final render and also look at adding smoke with embers in using the same technique as the flames. I added point lights within the torch at a very low intensity to create a feint orange glow emitting from the flames and done a test render to see how the main torch lit section of my castle would look.
I'm actually really happy with the way it looks and with a bit more time put into implementing the torches to the design I'm hoping it'll make a very believable atmosphere. I also like having more lights in my scene as just one wasn't enough to show off the scene, I think the lights compliment each other very well. I edited the flames slightly and added a glow in maya to the flame to give it a much better look, I'll settle for this as my final torch. I didn't bother with the embers or smoke in the end as when it comes to UDK the fire will be a particle effect, not a flat image. For the Maya flat image rendering purposes I thought smoke and embers wouldn't be required.

Tree Improvements.
I done some more research into snow covered trees and realised my trees, even with the snow on, they still looked pretty awful. Tree branches go downwards not stick out sidewards and snow doesn't bulk up all over the tree, especially in sheltered areas. For these reasons I thought I should re-do my trees using a new method I thought of. I made a plane again but this time I added divisions so I could shape the branches and leaves. I made it far larger so even thought there's more divisions then before there shouldn't be many more face. With this larger plane I added a slightly better branch texture, using the same image as before. I then took the plane I made for my branches and extruded them so they had some depth; smoothing the normals made for a rather convincing snow shape, which laid only on top of the branches as it should, especially with my normal maps on.
Taking these planes I duplicated them around and created an array around my main tree branch until I was happy with the outcome. The poly count is noticeably higher for the tree itself but the snow I generated using the nParticle system before had a unnecessarily high poly count so over-all I believe I've reduced the poly count but made a better, more realistic tree. Also the way this has been produced makes more believable shadows as the branches lay more as they should. I'm very happy with my outcome.
I then quickly exported my tree asset into my final castle scene and dotted them around. Just a test of the trees when implemented into my environment and also to test the glow effect I'd put on my torch flame material.
Bridge Creation.
With the terrain made and my castle placed where I wanted it, it's time to make my bridge to traverse the river. I made a simple plane in Maya and played with it till it crossed the river just how I would want it to. I then took that plane back into another Maya file and started making the modular pieces to make up my bridge knowing that it would fit in the gap. I tried to keep with the theme of my castle so used similar geometry in my elements.
Uvs Unwrapped and ready to be textured. I learnt from my mistakes unwrapping the rest f my castle and done it from planar mapping across the faces on each axis, this was a far more efficient and less distorted way of generating UVs for building objects than the automatic unwrap I had used primarily before. I also made sure not to make the pieces to small within the UV sheet so I avoided the low resolution problems of before.
I used a variety of techniques to produce the textures for my bridge and decided to make the snow as part of the texture rather than as extra, unnecessary geometry. I also settled on this idea, not only because I wanted to try it, but also because I wanted the walkway to have a coating of snow riddled with footprints to produce a realistic looking, regularly walked on surface. I'm very happy with the way the bridge came out and learnt how to produce far better textures during this bridge design process. The way I designed the bridge was a far more professional and efficient process and I will definitely be taking away a fair bit of knowledge to improve my future Maya elements.
With the bridge in place all textured it was time to think about putting my castle and terrain into a game editor.
Game Engine.
Now my castle was all finished it was time to put it into UDK (Unreal Design Kit) and piece it together with my snow particle effects and also set up lighting and collisions so I could not simply walk through my castle. It took me a little while to get my head around how UDK worked but the whole process was relatively simple and I found UDK to be a nice game engine to produce simple walk around videos of my work. I imported my torches from maya without the flames as I found a very good torch flame particle effect I could use in UDK and also added a water material found in the directory so my water could be animated. This I adjusted so it suited the way I wanted it to look. I also set up some lighting for the torches as well as adjusting the over-all night lighting to a less glowing and less harsh light, I also gave it a slightly blue hue to the shadows and highlights. Here's a video of me walking around my castle complete with everything using the UDK team death match game mode as way to show how it would be implemented into a real game. I quickly edited this video adding some music I thought enhanced the feel of my level.
There's a few things I'd like to tweak with this video which I will most likely do in my free time after this project. I'd like to change the gun in the persons hand to a lit torch and have footprints be left in the snow where the character walks. I also need to adjust the snow fall so I don't get snow falling inside my building. But these are all ideas for later, I will expand on this environment as I create more and more Maya assets until I have a large world to play in and explore. But I am happy with this as a starting point and I found using Maya and UDK very enjoyable and I've learnt more than I could possibly imagine about these 2 new pieces of software amongst others, such as crazy bump and world machine. I feel I have a lot to take from this project and after this project I really feel like I've taken a large step towards being a professional game designer rather than a student after creating game assets which can be played in a immersive environment.


Maya Renders.
With all my assets created and it put into UDK with it's more pre-built lighting it was time to set up my own lighting and cameras in Maya to render out some shots of my castle in: Morning, Sunset and night time. I used a Image plane for the background but if I where to do it again I would've made a sphere around my scene with a 360 sky and terrain that way I would've ended up with a more realistic surrounding of my scene. I will also use this technique in UDK when I tweak and add to my world. Over all though the results aren't too shabby and I'm reasonably happy with how they came out. With more time I would've taken all my pieces and re-done the textures adding a ambient occlusion as it really adds to the lighting to create far more believable and impressive light information.
No comments:
Post a Comment